|
|
|
|
|
 |
 |
|
|
Making music in musagi
|
|
|
|
|
|
This tutorial is meant to give an introduction to using musagi, and in the meantime teach some basic music skills if you lack them. I'm no certified musician though, so don't blame me if I give poor advice - just soak up the musagi info and try to forget the music part.
I'm sorry if the page is a bit image heavy, but I thought it was best to illustrate every step. Non-musagi images are probably copyright to the people I stole them from.
When moving the tutorial to this new site I had to shrink some images horizontally to fit. Click them to see original versions.
Starting musagi
Download musagi here. The default instrument is xnes, which is a rough simulation of the NES sound hardware. It is a good all-round instrument where you can easily get many different sounds (if you're not scared of some retro vibes).
The software itself is in no way limited to retro music, however it is what the current set of instruments is mainly geared towards since retro happens to be what I like most.
With a few samples and some tweaking of the filtering knobs you should be able to get a pretty sophisticated sound, if that's your game. Let's stick with xnes for now though, to keep things simple.
Keyjazz
Let's play around a bit with the keyboard and find a set of notes we can use.
Press some random keys and adjust the master volume to a comfortable level (click on the knob labeled "master" in the upper left and drag the mouse vertically to rotate it).
Set the base octave to 4 using the octave up/down buttons in the lower right. Make sure tooltips are on.
Example:
Press E-Y-U-I (found Y-U-I randomly, then searched for a lower suitable key, found E)
Press E-Y-E-U-E-I (alternating between bottom note and a rising scale)
Press E-Y-E-U-E-I-E-U-E-Y (same, but going up and then down the scale)
Press I-I-U-I-Y (some random melody thing)
Press I-Y-I-U-E (alternating between I and random picks from the scale, with one exception from the rule)
You'll notice that these all have the same melancholic sound to them. That feel comes mostly from the set of notes used, not the order or manner in which they are played.
Press I-U-T-W (long hold on each, Zelda 2 intro! I just stumbled upon that one now :P)
Zelda 1 intro is J-V-V-J-H-G-H ... J-G-G-J-N-B-N (but with a slightly different instrument setting, sort of like this)
When you're done playing around, load back a regular xnes and continue below. Just press the "new" button around top center of the window, select "xnes" from the popup and accept the warning. You could also create a new xnes in a different instrument slot by selecting one to the right before pressing the button.
Base notes
Now we'll try to determine a set of four base notes/keys to build from, preferably in harmony with what we just played around with.
Example:
Press I-Y-E-U (long hold, repeating)
Press comma-N-C-M (same notes but one octave lower, just follow the columns of keys down the keyboard)
I'm assuming a swedish keyboard mapping for simplicity, you may have to adjust a few things or just ignore some keys if you use a different one. In fact I'm not sure if the application will handle weird mappings properly. The letter and number keys should be ok, but comma, period and dash (which are in the lower right, between M and right shift on my keyboard) could be useless on foreign keyboards. Luckily, these keys are redundant (though convenient). See below.
Interlude: Notes and keyboard layout
Music theory, crash course (skip if you know it):
Western music is made up of so-called notes, of which there are 12 distinct ones repeating in what's known as octaves. One octave has 12 notes, the next octave also has 12 notes where the pitch/frequency of each is twice that of the corresponding note in the previous octave. Human hearing, and musagi, can handle a range of about 10 octaves.
The basic notes are: C, C#, D, D#, E, F, F#, G, G#, A, A#, B

The ones with a # are "sharp", corresponding to black keys on a piano. The white keys make up the major scale (starting at C), which is a very common scale. A scale is just a series of notes that go well together and that can be used to construct "melodies" (which is the name I tend to use for a determined series of notes played in succession, not 100% sure about the formal terminology here and frankly I don't much care).
For the record, moving one "semitone" from a note is when you go to the next one in line, regardless of whether it's black or white.
What we did up there with E-Y-U-I was picking out a simple scale (actually a subset of the major scale). There's an almost infinite number of different scales possible, but generally you would want to stick with a few guides to make sure the notes sound nice together:
- Stick to all-white or all-black keys at first. White and black keys can be mixed, but it's tricky to avoid dissonance (unless you walk along known scales from a starting note, like 047 below). If you succeed you could get a more rich and colorful sound than with pure black or white keys alone.
- Moving in steps of one or two generally sounds better than steps of three.
- Use the major scale. This scale only corresponds to the white keys if you start at C. Starting at another note you can still generate any part of the scale by moving up a number of semitones in the same pattern as if you were pressing white keys, which means:
0,2,2,1,2,2,2,1 in consecutive semitone steps to go from the first note in one octave to the first in the following higher octave. If you look above you'll see that this is the "semitone walk" you perform when pressing white keys from C and up.
As an example you have the classic 047 chord which, starting from any note, is built like this: 0, (0+2+2)=4, (0+2+2+1+2)=7
Starting at E (which is also E on the keyboard, conveniently) you get E-6-U, from F# (number key 5) you get number keys 5-7-9. It's convenient to move up the first four and then the additional three from there to 7. See below for a proper walkthrough of the keyboard mapping of notes.
The computer keyboard is mapped to a regular piano keyboard in the following way;
First row of "white keys": Z, X, C, V, B, N, M, comma, period, dash
Second row of "white keys": Q, W, E, R, T, Y, U, I, O, P (same as first, but one octave higher)
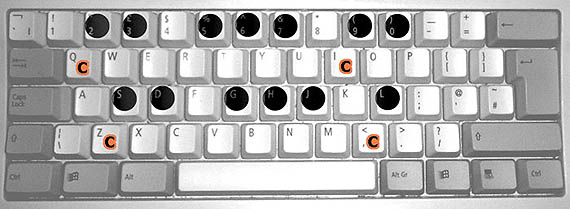
(the image curiously isn't depicting a swedish keyboard. I just image-googled and picked the first decent one, comma and period seems to be in the right places but the dash is replaced with a slash)
Z, comma, Q, I all correspond to note C. Z is C-1, comma and Q are C-2 (yes, the same note, the two rows overlap slightly), I is C-3.
All notes are offset by the base octave shown in the lower right of the window.
Black keys are where you'd expect them on a regular piano keyboard - above and between the corresponding white keys. The geometry is a bit different though, obviously. It can get pretty tough to remember where the black keys are (and which spots are "dead"/missing blacks), but I've tagged the bottom sides of my "black keys" with a marker and it really helps. It's something worth considering if you get annoyed at searching for blacks all the time (make sure you can wash the marker off if you'd want to later, it should be easy with alcohol or thinner).
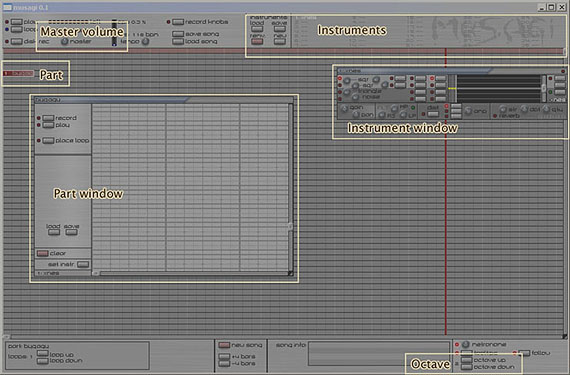
Making an actual song
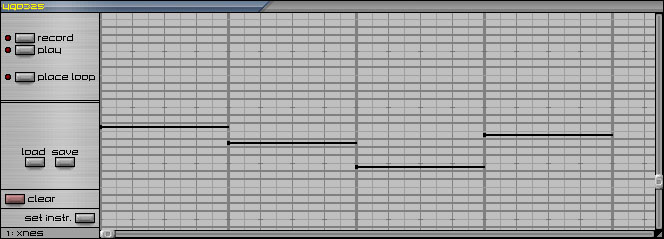
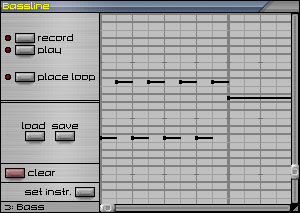
Let's start with the base note sequence we made up earlier ("I-Y-E-U" or "comma-N-C-M", actually C-A-E-B as real notes). Drop the base octave down to 2.
We'll need a "part" to put the notes in. There should be one around by default. Select the part window that's visible in the main song area (it's got record and play buttons in it, among other stuff - if it's not there you can double-click the little blue bar that should be somewhere to the left of the main song area - if THAT's not there you can middle-click or alt-click in the song area to create a new part).
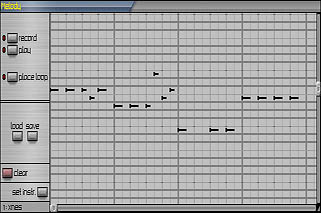
With the window selected, press the four keys and notice where the white lines appear. The light and dark horizontal bars correspond to a piano keyboard rotated 90 degrees, with higher octaves going up. Time extends to the right.
Click and drag, creating the following pattern:
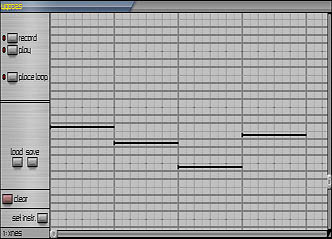
You will have to scroll or resize the window to fit all four notes. Right click to erase notes if you make a mistake. If you just want to change the duration of a note you can click on any part of it and drag.
Hit play. It should sound like what you were playing before, except maybe a bit slower. That's ok though, as this is supposed to go in the background, determining the key of the overall song.
To keep things tidy, you can rename this part to "Bassline" instead of the random name it has by default. Right-click on the titlebar of the window or on the red part in the song area to edit the name. Enter confirms, escape cancels. In general you can edit any string by right-clicking on it, except for static labels of course.
Now save the song. Do this all the time, whenever you've made a significant change. If you're about to change something big you might want to save it with another name to have the option of reverting back to what you had before (there's no undo!).
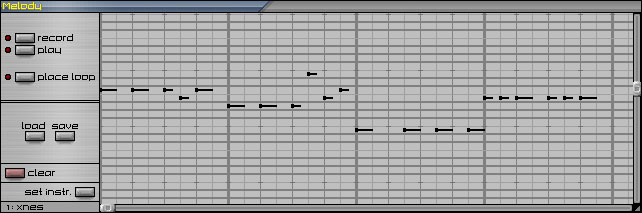
Adding a melody embryo
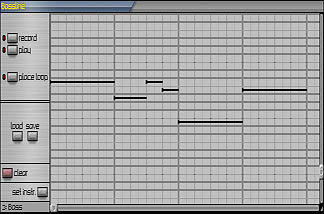
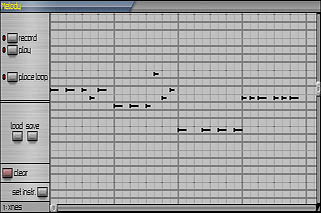
Create a new part (middle-click or alt-click in the main song area, not in the Bass part window). Move the windows around so that they are above one another but at the same horizontal position, this will allow you to synchronize their contents.
Put some notes in according to the pattern shown (put them on the same note as the corresponding base note, but a few octaves higher - remember how we played the four notes in base octave 4 to begin with, notice how the melody window is scrolled up)
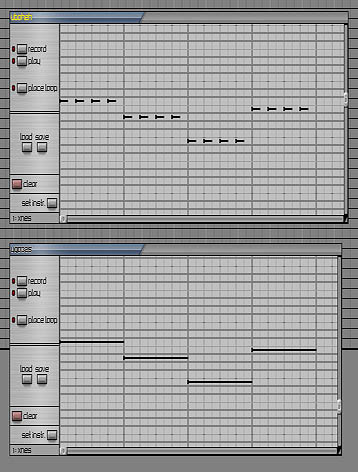
Move the two parts in the song area to make them both line up with the left edge and then play the song. It may not be advanced stuff, but at least it's in harmony :)
Adding a simple beat
Ok, we need some percussion to help jazz things up a bit. The quickest way to get something down is to use the noise channel of xnes and different notes to get varying effects. Create a new xnes by selecting an empty instrument slot and clicking the "new" button.
Double-click the newly created xnes in the list to bring up its instrument window.
There are four channels in the xnes - two square waves, one triangle wave and one noise channel. These are all played simultaneously at the same note (unless you edit the arpeggio, we'll get to that at some point) when you press a key, but you can change the volume of each individually. By default the first square wave is at full volume and the others are at zero.
To get a noise sound we'll have to bring up the noise channel volume and turn the square down to zero. Do this using the knobs to the left of the window, the bottom red light should come on and the top one should go out. If you press some keys now you'll hear noise at varying pitches.
Rename this instrument "Noise".
Ok, do the same thing as with the melody and create a new part in the song area. You can hide the other windows to make things less cluttered, just double-click their title bars or the corresponding red parts in the song area (red means its window is shown). Find a relatively dark noise (not too dark, but you can go down to base octave 2-3 perhaps) and put in some short notes like this:
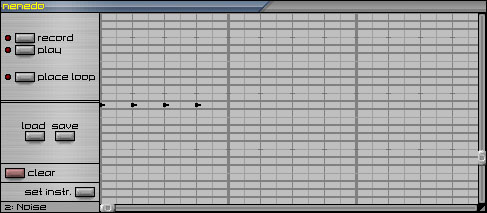
We've put in four "beats" during the span of one of the base notes. Play it (use the play button in the part window, not the song play button). To make things a tiny bit more interesting we'll add some other "drums" at different intervals. Very bright noise could be used as hihats and middle-ground noise might pass for a snare drum, at least for now. Make the hihats pretty bright - even if the actual pitch of the noise only goes so far they will get a bit quieter if you put them high enough. Obviously you can change the volume of the noise channel to adjust the relative volume of this instrument to all the others, but there's currently no way of changing the volume of individual notes/triggers for the same instrument.
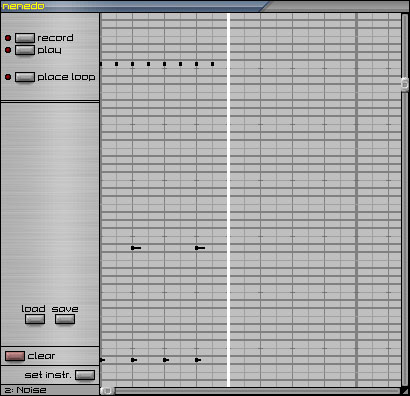
Now then. This would be a pain to manually extend over the entire duration of a song. We'll just repeat this bit instead. Click the "place loop" button in the part window and click on the first dark vertical bar to enclose the section we just made. If you hit play again it will repeat forever.
Move this part in the song view to line up with the left edge and click the "loop up" button in the lower left of the main window three times to make the beat repeat throughout the duration of the other tracks.
You can play the song again now.
Having some fun
Right, now we've done the boring work of setting up a skeleton for our tune. The fun part is ahead - tweaking stuff around forever to make it sound better :P
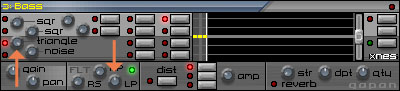
For starters, let's change the bass sound to something other than a pure square to make things a bit smoother. Create a new xnes and name it "Bass". Set it up so that the triangle channel is at full volume and the others are silent. You can also turn up lowpass filtering halfway in the "gapan" effect window that's attached to the main instrument window - it's to the left of the middle, labeled "LP". Lowpass filtering removes some of the noise and brighter parts of the sound to make it cleaner (and muffled, but that's what we want for bass). Change the base octave to 2 and play a few dark notes.
Now, to make our existing bass line play using this instrument we'll just have to bring that part window up (double-click the Bassline bar) and click the "set instr." button way down the bottom. This will tell this part to use the currently selected instrument. Instruments are selected either by clicking their names in the list at the top of the screen or by clicking in their instrument windows.
Hmm, maybe that wasn't too much fun. Changing instruments can make a big difference though.
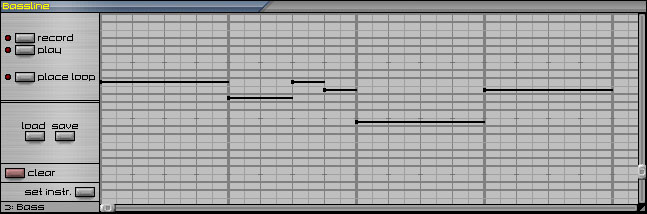
Since we're in the Bassline window we might as well throw in a bit of a twist on the boring note progression. We don't want to go too wild on the bass, but a little something is needed to spice it up. After some experimenting I found the following variation:
Remember to only pick notes from the scale we're using, but you can go up or down in octave freely. For simple but powerful dance-ish songs you can alternate between one note and the same note offset by one octave, like this:
I don't think that would fit into this song right now though, so I won't be using it.
Having some real fun
No more of this bassline crap. Let's make the melody more sparkly!
This is where you apply various rules and your ear to change the sequence of notes without destroying the overall harmony. The two most important rules are to always pick notes from our scale (plus/minus one or several octaves) and to keep the notes mostly around the correct base key, which is the original bass note we put in for that area. Usually you'll want to have the first melody note of each bass section to be a pure octave offset of that bass note, after that you can pretty much go wild and it will still sound ok. It doesn't hurt to jump back to the base note a few times though.
During this you can either play the part by itself or play the whole song to hear it in context. If you get sick of listening to everything from the start each time you can left-click on a spot in the red bar at the top of the song area to select the start position for the song.
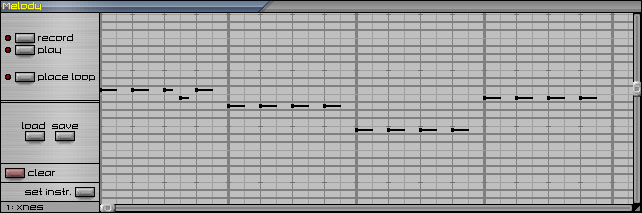
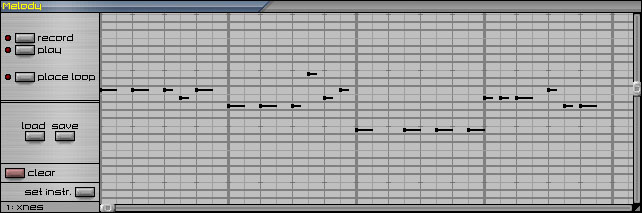
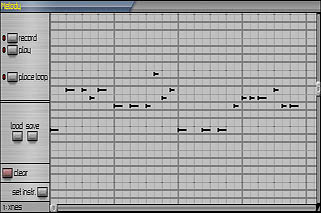
Let's spice up the first section.
One simple construct that always tends to work is to alternate between two or more notes in a regular pattern. We don't have to do this for a long repeating sequence though, just put in one of the other notes in the scale between two of the original ones, like this:

That instantly sounds more interesting than what we just had. To add more punch, we can change the length of a few notes:

Funky.
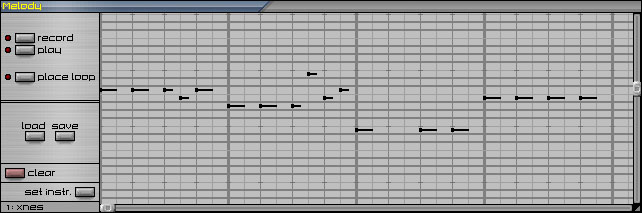
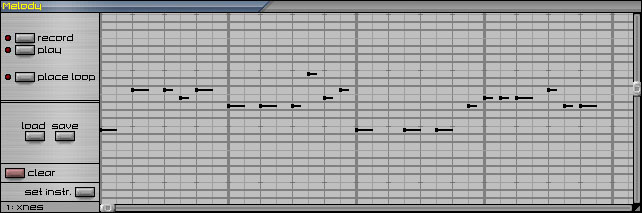
Now, one thing I just have to do is make some kind of variation leading out of the second section, since we already have a thing going in the bass there. Things like this where several channels work together can sound really nice.
This is what I came up with:
Notice how I picked a note from the next octave to get more range. It's still a member of the same scale (the lowest note, E). I also removed the second note from the third section just because I thought it sounded too repetitive and mechanical having the same pumping pattern everywhere. Sometimes you need a little breather to keep things comfortable.
You'll notice that we've mostly changed the end of each section so far. It's nice to have creative transitions between different base keys/chords, and that usually means doing something at the end of one right before entering the next.
Still having fun, and adding more advanced rhythm
Even with removing that last note things are still a bit mechanical and dull. It's good enough for the first bit, but we'll need something different now to contrast it. Delaying bits of a pattern to make it go off-beat with the rest of the song can be very effective - let's try it:

(you can ctrl+drag to move a single note around, or shift+drag to select several notes which you can then move by simply click-dragging, right click in empty space to deselect)
Ok, that's nice and all, but we got a huge gap there. Let's extend that off-beat part with another note to avoid dead time.

Better.
One interesting effect in doing this is that the end of the notes (the release point) happen to coincide exactly with where the notes "should have been" if we hadn't moved them. This can feel like "inverted"/"negative" notes triggered at these points, so you get a kind of sucking effect (though hopefully a good suck, if it plain sucks then just revert to whatever you had before).
For the last section we could do something like this:
That sounds incredibly dull, but I wanted to illustrate the basic pattern before doing this:

It's often useful to think of rhythm and melody as separate things, to make it more manageable.
I'll add one final touch for good measure:

That's the melody done. Play it with the rest of the song if you haven't already. You can also set up a loop point for the entire song to keep it repeating. Right-click in the top red bar or click-drag the dark red vetical bar to put it on the fourth bright line, just at the end of our parts. Then click the "loop" button (below "play") and click-drag the faint vertical bar that appears so that it is at the very start of the song, this is the loop position, where it will jump to after reaching the end. You may also place this by holding shift and left-clicking on a spot in the top red bar.
The transition from the very end of the song to the first bit sounds kind of dull. Changing the first note might help a little:
Not stellar, but it'll have to do.
You can change the beat using the same concepts of rhythm as we did for the melody - delay beats or play with the lengths of them. Of course not all drum sounds can realistically have different duration, it's basically just the hihat that can be opened and closed to create different lengths. In our synthetic world though, we can experiment as we please.
If you want more variation in the beat without too much repetition you can draw out two or four sections of drums and move the loop point. This will allow for variations that don't repeat at every change of base key.
Oh yeah, by the way: Remember to stick with the power-of-two rule when making repeating sections - use 1, 2, 4 or 8 repeating pieces to avoid having things go out of sync. Going out of sync in a small enclosed area can however be very effective. In fact I think I will illustrate that using the beat, like this:

...where the "bassdrum" hits are actually repeating on a different interval than the rest. This leads to a break in the pattern when the loop comes, but that sounds just fine. Small groups of three like this or similar can be thrown in here and there to "groove" things up. It works for melody and other things as well.
End!
If you wanted to extend the song from here you can make new parts and place them after the ones we've already got. You can also loop things like the bassline or other things that don't need to change. To avoid starting from scratch with the new stuff, you can select a part and hold shift + middle-click (or shift-alt-click) in an empty spot to create a copy of it. Holding ctrl instead will create a "clone", which is like a linked copy that always has the same contents as the original part. This can be used instead of looping if you want to. To delete a part, select it and press DEL. Unfortunately this key always deletes the selected part, even if you happen to press it while working in some other window or editing a string. I'll definitely have to change this.
Maybe add another instrument to go along with the ones we've already put in? There could maybe be a kind of quiet string instrument in the background, following the base notes but offset to one or two octaves above the melody.
It's also conceivable to have another section of the song with different scale/base notes, to change the mood. Modifying the tempo is also useful (although currently you can only have one tempo setting for the entire song).
One idea if you're making a larger song is to not start at the very left end of the song window, in case you decide to add stuff before it. One way of fixing such a situation easily though is to place the song start marker at the beginning and then press the "+4 bars" button in the bottom middle of the window. This will move everything to the right a bit.
I think this will wrap up the first tutorial session. There might be another one to cover more advanced instrument settings, but in the meantime you can refer to the HTML documentation for details.
 tutorial.smu (27 kB) tutorial.smu (27 kB)
The finished song.
Back to all articles
|
|
|
|
|
|
|
 |
|
|
|